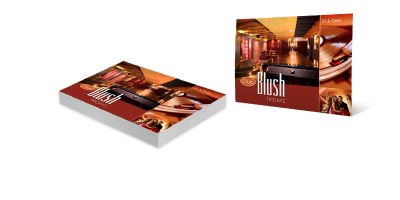
Club Flyers are similar to post cards, but rather than being mailed, they are typically passed out on the street to promote upcoming events. They are usually colorful and graphics-heavy with only basic information, like the location, price, and time of an event.
Recommendations
The most common order options are 4.25" x 5.5" on 16 Pt. Gloss Cover stock. Almost always, Club Flyers are printed full color on both sides (4/4) and are coated UV 2 Sides.
For lower quantities and additional stock choices, please check out our 4-Color Digital Club Flyers.
Marketing Tips
Club Flyers are a great way to catch foot traffic, promote your event, and can even be used as tickets or invitations. They often show off a brand, promotions company, or event with eye-catching graphics. Our high quality flyers are less likely to get discarded than other options.
Companies often hire street teams to pass out Club Flyers, leave them on cars, or place them in retail establishments.
Standard Sizes
Any Trim Size
Standard Sizes
Our standard sizes, listed below, are the most popular in the industry:
4.25" x 5.5"
Any Trim Size
You can order custom sizes by using the "Any Trim Size (Edit Below)" option in the pricing calculator. First select the standard size option which is larger in both dimensions (height and width) than your desired custom size. In the "Any Trim Size (Edit Below)" box on the pricing calculator (shown below), type in your desired dimensions. Please remember if you are ordering "Any Trim Size" for a product that is folded, "Any Trim Size" dimensions are for the product before it is folded.
Be mindful of the custom trim when submitting a file to prevent any part of your design from being trimmed away. It's extra important to look at a proof when ordering custom trim.
14 Pt Uncoated Cover
14 Pt Gloss Cover
16 C2S Pt Gloss Cover
14 Pt Uncoated Cover
You may be familiar with this type of stock from thick index cards, though the finish is much higher quality.
This is a very versatile stock. The uncoated finish is good when you don't want a slick and shiny look, while the firm 14 Pt. stock folds precisely.
14 Pt Gloss Cover
You may be familiar with this type of stock from presentation folders.
This thick and stiff stock is coated on both sides with a glossy finish.
16 Pt C2S Gloss Cover
You may be familiar with this type of stock from heavy bookmarks or other products printed on a semi-rigid card stock.
This is our thickest stock and comes with a gloss coating on both sides. Because of its thickness, it is not ideal for folding unless scored first.
4/4 (Full Color Both Sides)
4/1 (Full Color Front / B&W Back)
4/0 (Full Color Front Side Only)
4/4
Full color on both sides of the sheet. This option can reproduce the range of colors you see in a typical photograph out of the standard 4 printing colors: cyan, magenta, yellow, and black. Typical examples of this are magazine covers and high-end catalogs.
4/1
Full color (cyan, magenta, yellow, and black as above) on the front and black on the back. A typical example of this is a flyer.
4/0
Full color (cyan, magenta, yellow, and black as above) on the front and no printing on the back. A typical example of this is a poster.
AQ 1 Sides
Satin AQ
UV 1 Side
UV 2 Sides
Spot UV
AQ 1 Side
AQ is short for Aqueous Coating. This is a semi-gloss, environmentally friendly, water-based coating applied to the front of the printed piece. It provides additional gloss and protection, and it can be written on with a ballpoint pen.
Satin AQ
AQ is short for Aqueous Coating. This is a matte finish, environmentally friendly, water-based coating applied over the entire printed piece. It reduces the gloss of the printing and it can be written on with a ballpoint pen.
UV 1 Side
UV is short for Ultra Violet Light-Cured Coating. This is a high-gloss coating applied over the front of the printed piece. It is not recommended for printed material you need to write on after being produced.
UV 2 Sides
UV is short for Ultra Violet Light-Cured Coating. This is a high-gloss coating applied over the entire front and back of the printed piece. It is not recommended for products you need to write on after being printed.
Spot UV
UV is short for Ultra Violet Light-Cured Coating. This is a high-gloss coating applied to specific spots of your choosing.
Spot UV 2
SidesHigh-gloss coating applied to specific spots of your choosing on both the front and back of the printed piece for emphasis or as a design element. Do not put spot UV anywhere that you will need to write.
File Setup instructions required for the following:
For Spot UV Front w/ Overall UV Back:
Create a Spot UV layer for front and a overall layer for the back.
For Spot UV Front w/ Overall Dull Varnish Back:
Create a Spot UV layer for front and NO layer for the back.
Due to off line Spot UV. We recommend no type below 8pt, no fine lines, and no serifs that require the Spot UV.
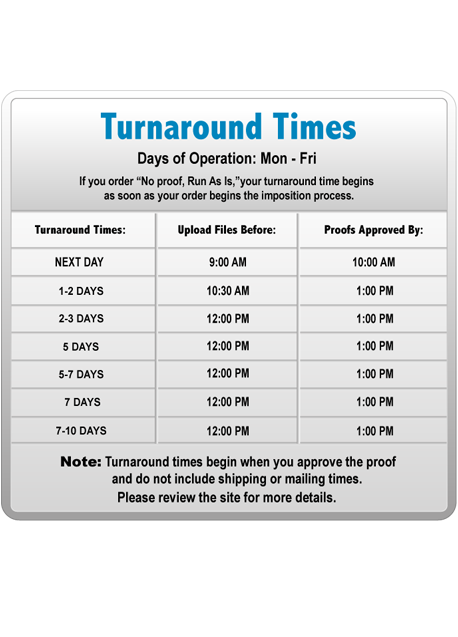
Explanation of Turnaround Time
1-2 Day
2-3 Days
Explanation of Turnaround Time
See a quick chart showing turnaround times
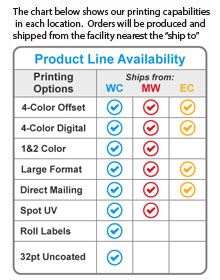
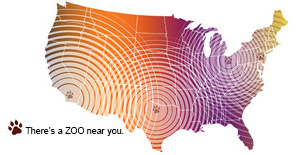
Production timeline beings upon approval of the proof. All times are based on standard business days Monday through Friday excluding federal holidays. For orders shipping to the West Coast, please use the Pacific time zone. For orders shipping to the Midwest and East Coast, please use the Eastern time zone. Please see the below map.
Please note the production timeline does not include shipping or mailing time. During the order process you will have the option to select from available production timelines and your preferred shipping method.
Our products are the same great quality for every turnaround time we offer.
1-2 Day Turnaround
If you order a proof (Online PDF or Hard Copy Proof), your turnaround time begins as soon as you approve your proof in our system. If you order "No Proof, Run As Is" (only recommended if you are certain you want us to print what you sent as is), your turnaround time will be based on the guidelines listed below. Once your order is in imposition, you should receive an email with your estimated order completion date (does not include shipping or mailing).
Guidelines
Files must be uploaded before the cut off time, which is 10:30 a.m. Pacific for orders produced in our West facility and 10:30 a.m. Eastern for orders produced in our East facility. If you request a proof, you must approve your proof by 12:45 p.m. in the time zone your order is produced for turnaround time to begin.
A. 1-2 Day Shipped Orders
These orders will be ready to ship in 1-2 business days after 4:00 PM. Example: A Next Day order placed Monday before cutoff would be ready to ship Tuesday after 4:00 PM. A 1-2 Day order placed Monday before cutoff would be ready to ship on Tuesday or Wednesday after 4:00 PM.
B. 1-2 Day Will Call Orders
These orders will be ready to pick up in 1-2 business days after 4:00 PM. Example: A Next Day order placed Monday before cutoff would be ready for pick up Tuesday after 10:00 AM. A 1-2 Day order placed Monday before cutoff would be ready for pick up on Tuesday or Wednesday after 4:00 PM.
C. 1-2 Day Free Delivery Orders
These orders will be ready for delivery in 1-2 business days. Example: A Next Day order placed Monday before cutoff would be ready to deliver on Wednesday between the hours of 8:00 AM and 4:00 PM. A 1-2 Day order placed Monday before cutoff would be ready to deliver on Wednesday or Thursday between the hours of 8:00 AM and 4:00 PM *Free Delivery adds one day to your print cycle.
Note: Free delivery is currently only offered to customers near our California production facility. To see if your zip code qualifies, visit "Free Delivery" under the "Services" section.
Files uploaded after the cut off time will be processed the following business day.
2-3 Day Turnaround
If you order a proof (Online PDF or Hard Copy Proof), your turnaround time begins as soon as you approve your proof in our system. If you order "No Proof, Run As Is" (only recommended if you are certain you want us to print what you sent as is), your turnaround time will be based on the guidelines listed below. Once your order is in imposition, you should receive an email with your estimated order completion date (does not include shipping or mailing).
Guidelines
Files must be uploaded before the cut off time, which is 10:30 a.m. Pacific for orders produced in our West facility and 10:30 a.m. Eastern for orders produced in our East facility. If you request a proof, you must approve your proof by 4:00 p.m. in the time zone your order is produced for turnaround time to begin.
A. 2-3 Day Shipped Orders
These orders will be ready to ship in 2-3 business days after 4:00 PM. Example: A Next Day order placed on Monday before cutoff would be ready to ship Tuesday after 4:00 PM. A 2-3 Day order placed Monday before cuttoff would be ready to ship on Wednesday or Thursday after 4:00 PM.
B. 2-3 Day Will Call Orders
These orders will be ready for pick up in 2-3 business days after 4:00 PM. Example: A Next Day order placed Monday before cuttoff would be ready to pick up Tuesday after 10:00AM. A 2-3 Day order placed Monday before cutoff would be ready pick up on Wednesday or Thursday after 4:00 PM.
C. 2-3 Day Free Delivery Orders
These orders will be ready to deliver in 2-3 business days. Example: A Next Day order placed Monday before cutoff would be ready to deliver Wednesday between the hours of 8:00 AM and 4:00 PM. A 2-3 Day order placed Monday before cutoff would be ready to deliver on Thursday or Friday between the hours of 8:00 AM and 4:00 PM. * Free delivery adds one day to your order due date.
Note: Free delivery is currently only offered to customers near our California production facility. To see if your zip code qualifies, visit "Free Delivery" under the "Services" section.
Files uploaded after the cut off time will be processed the following business day.
Shrinkwrap
Shrinkwrap
Shrinkwrap is a thin, plastic wrapping designed to group the items
you order into desired quantities. Additionally, it helps your order
arrive in tip-top condition because it reduces rubbing during shipping.
It is called "shrinkwrap" because after the plastic is placed around
each bundle, it is shrunk with gentle heat for a better fit.
Options:
5 per package
10 per package
25 per package
30 per package
40 per package
50 per package
75 per package
100 per package
Please note that if your order quantity and the number of pieces per
package will result in more than 100 individually shrinkwrapped packages,
your order may require an additional 1-2 days for fulfillment.
For other quantities, please submit a custom estimate.
Quantity
When to choose Offset
When to choose Digital
Custom Orders
Quantity
Quantity availability is dependent on the order specifications you choose. To see available quantities, complete all order specifications in the pricing calculator and click on the "Quantity" dropdown menu.
Due to our production process, we print in specific increments. If you would like an amount not listed in the pricing calculator, request a custom estimate for the quantity needed.
Generally, we print more than the quantity ordered. Due to this being a manufacturing process, the total finished quantity may vary. These quantities can vary +/- 5%, with the norm typically being more than less. Standard industry procedure considers this range "shipment in full."
When to choose Offset
4-Color Offset printing is ideal for lower prices on large quantity orders or any time you would like coating on your products.
Almost always, people choose this option when ordering large quantities.
When to choose Digital
4-Color Digital printing is ideal for lower quantity orders and additional paper options, and usually has even faster turnaround times. Digital products cannot be coated.
Custom Orders
If you would like to order product options not available in the pricing calculator, simply request a custom estimate. To request a custom estimate, click on "Estimates" located at the top of the page.
In many cases, it is more affordable to order one of our specified quantities rather than placing a custom order. Custom orders are most commonly placed for order specifications not listed in the pricing calculator.
Get Templates
File Preparation
File Orientation
Bleed and Safe Area
Proofs and File Check
Spot UV File Preparation
Please Select Template Below:
PDF stands for Portable Document Format. This template can be imported into: InDesign, Quark Express, Illustrator, Corel Draw, and many other content creation programs.
JPEG stands for Joint Photographic Experts Group and is a basic raster file format. This template is recommended for Photoshop.
EPS stands for Encapsulated PostScript. This template is recommended for advanced Illustrator users only.
File Preparation
In order to ensure your files are print-ready, we recommend that you upload them in PDF format. When you generate a print-ready PDF, your computer will use the settings in Adobe Acrobat Distiller or any other PDF generating programs you may use. Please make sure that these are set properly before generating your PDF file.
If you are uploading PDF files created in Photoshop, please be sure all layers are flattened.
We also accept .JPG (JPEG), .EPS and .TIF (TIFF) file types, however PDF is the preferred format.
Check your file to make sure it meets our file creation guidelines. This will help speed up the production of your project and give your printed piece the best results.
Use the CMYK colorspace (Cyan, Magenta, Yellow, blacK). These are industry standard printing colors. CMYK colors are different than RGB (Red, Green, Blue), which are used to display colors on your screen.
Use a minimum resolution of 300 dpi for image files.
Specify trim area with crop marks. (Don't place crop marks inside the work area.)
Artwork should have 1/8" (0.125") bleed extending past the trim line. This is to prevent minor cutting variations from leaving unintended results at the trim edge.
Safe Area is the 1/8" (0.125") area inside the trim line. Do not put critical information or images within the Safe Area. This is to prevent minor cutting variations from leaving unintended results at the trim edge.
If you want printed borders, they must be placed a minimum of 1/8" (0.125") inside the trim line and include bleed. This is to prevent minor cutting variations from leaving unintended results at the trim edge.
File Orientation
Please click the link below for an explanation of file orientation.
We require that you extend any images that run up to the trim line a minimum of 1/8" (0.125") past the trim line to create "bleed". Depending on what program you use to create your file, this may or may not change the total image area of your file. Programs like Photoshop that do not allow the creation of "bleed" or the addition of crop marks will require an image area that is 1/4" (0.25") larger than your desired final overall image area in both dimensions.
Safe Area is the 1/8" (0.125") area inside the trim line. Do not put critical information or images within the Safe Area. This is to prevent minor cutting variations from leaving unintended results at the trim edge. If you choose to make less than this minimum clearance, we will NOT be responsible for items that are cut off in this area.
Proofs and File Check
We offer three proof options:
Online PDF Proof: You will be sent a link to view your proof via email. Please keep in mind that this is only a proof for content and positioning; the color on your screen may vary from the color of your final product, depending on your monitor and viewing conditions.
Hard Copy Proof: The Hard Copy Proof can either be picked up on-site or shipped to you. Please keep in mind that this is a proof for content and positioning and is not printed on your actual job stock. Color may vary slightly when printed on the stock you ordered. When ordering a Hard Copy Proof, you will receive a complimentary Online PDF Proof, as well.
No Proof, Run As-Is: This option is for the industry professional who is certain their project is ready to hit the press and does not require the additional security of a proof.
File Check:
File Check:
If our prepress department sees anything questionable with your file, we will contact you via email with our concerns. Should prepress email you, please note that your job is not considered fully submitted until you respond to this email. This should be factored into your turnaround time.File check does not apply to No Proof, Run As-Is. No Proof, Run As-Is jobs print from the exact file(s) you upload unless it is not possible to print because your supplied file does not match the specifications ordered.
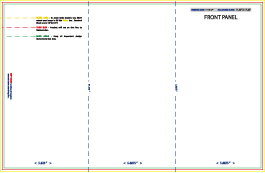
How to check your Online PDF:
The black crop marks indicate the final trim size. The Red line ( Dashed ) indicates the (Score) The Green line ( Dashed ) indicates the (Perf). The Red Line (Solid) indicates the ( Cut or Trim ) line.
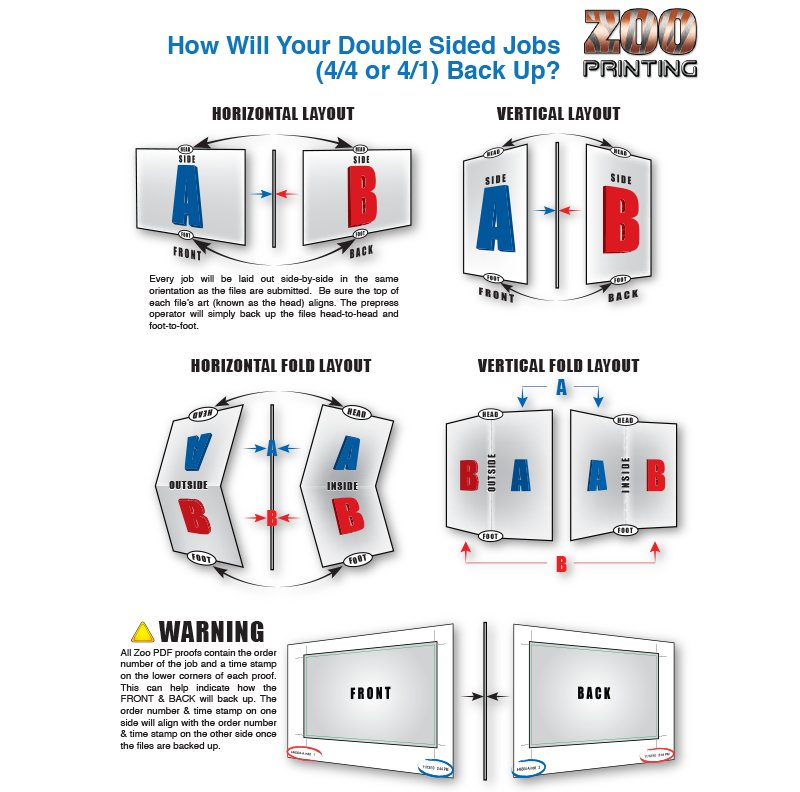
The verbiage on the file, this will indicate the page position after folding.
Please Note: The charge for our technical team to review your file when first submitted is included in the price of your order. If they note technical concerns with your file, they may email you with their concerns so you can upload a corrected file. If subsequent uploads still contain errors, you may be charged an additional prepress fee to review your file again.
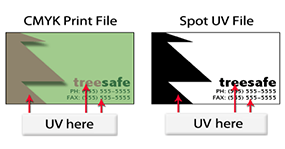
Spot UV File Preparation
In order to ensure your files are print-ready, we recommend that you upload them in PDF format. When you generate a print-ready PDF, your computer will use the settings in Adobe Acrobat Distiller or any other PDF generating programs you may use. Please make sure that these are set properly before generating your PDF file.
We also accept .JPG (JPEG), .EPS and .TIF (TIFF) file types, however PDF is the preferred format.
Check your file to make sure it meets our file creation guidelines. This will help speed up the production of your project and give your printed piece the best results.
1. Use the CMYK colorspace (Cyan, Magenta, Yellow, blacK). These are industry standard printing colors. CMYK colors are different than RGB (Red, Green, Blue), which are used to display colors on your screen.
2. Create a Spot UV template along with regular file.
The Spot UV template file is used to show where the UV coating needs to be applied. Create a mask file in a vector based program such as Illustrator or CorelDRAW. Use solid 100% K to indicate where you would like the UV. Do not use shadows, glows or grayscale images. White areas will indicate no UV.
3. Use a minimum resolution of 300 dpi for image files.
4. Specify trim area with crop marks (Don't place crop marks inside the work area).
5. Artwork should have 1/8" (0.125") bleed extending past the trim line. This is to prevent minor cutting variations from leaving unintended results at the trim edge.
6. Safe Area is the 1/8" (0.125") area inside the trim line. Do not put critical information or images within the Safe Area. This is to prevent minor cutting variations from leaving unintended results at the trim edge.
7. If you want printed borders, they must be placed a minimum of 1/8" (0.125") inside the trim line and include bleed. This is to prevent minor cutting variations from leaving unintended results at the trim edge.
Design Online
How to Use Design Online Video
Design Online
You can create a personalized design in just a few minutes. Once you click the "Start Your Design" button, you're taken to a huge library of design templates. You can search by specific category or select "generic" for personal use. Making changes to the text, font size and uploading a picture or logo on your chosen template is as easy as using a basic computer program. After you're done making changes, you are able to instantly view an online proof and order it for print.
There are professional design templates for almost any personal and business need.